P>Welcome to the 5330 and 50 386 solid bottom basket installation video we will be demonstrating bottom side and door mounting applications before we begin you will need the following tools a power drill with the number two Phillips bits and a 3/32 inch bit a Philips screwdriver scissors tape measure pencil and tape in your box you'll find the following parts a solid bottom basket or solid bottom basket u-shaped bottom mount brackets slides release levers rear slide brackets Pacers side mount fragments L mounts brackets and door mount brackets you'll find the following screws m four by six machine screws em 4 by 10 Flathead screws euro screws 1/4 20 by half inch washer head screws number six by half inch flat head screws number six by three-quarter inch flat head screws number eight by five eighths inch truss head screws and an instruction sheet with templates bottom mounting a line and attach the bottom mount brackets to the front and rear of each slide using the m4 by 10 Flathead screws your bottom mount template has several numbers along the top and bottom edge cut along the numbers that correspond with the size of your individual unit we have a 15-inch solid bottom basket, so we will cut along the number 15 measure the opening of your cabinet and mark its center points align the front of the template to where the back of the cabinet door will be for overlay doors such as ours align the front arrow of the templates to the front of the cabinet opening secure with tape pre-drill the holes on the template with your 3/32 inch drill bit attach the slide sets to the cabinet door using the number 8 by 5/8 inch truss head screws snap the two bracket spacers...
PDF editing your way
Complete or edit your 5330 of irs anytime and from any device using our web, desktop, and mobile apps. Create custom documents by adding smart fillable fields.
Native cloud integration
Work smarter and export form 5330 directly to your preferred cloud. Get everything you need to store, synchronize and share safely with the recipients.
All-in-one PDF converter
Convert and save your 5330 form as PDF (.pdf), presentation (.pptx), image (.jpeg), spreadsheet (.xlsx) or document (.docx). Transform it to the fillable template for one-click reusing.
Faster real-time collaboration
Invite your teammates to work with you in a single secure workspace. Manage complex workflows and remove blockers to collaborate more efficiently.
Well-organized document storage
Generate as many documents and template folders as you need. Add custom tags to your files and records for faster organization and easier access.
Strengthen security and compliance
Add an extra layer of protection to your 5330 of by requiring a signer to enter a password or authenticate their identity via text messages or phone calls.
Company logo & branding
Brand your communication and make your emails recognizable by adding your company’s logo. Generate error-free forms that create a more professional feel for your business.
Multiple export options
Share your files securely by selecting the method of your choice: send by email, SMS, fax, USPS, or create a link to a fillable form. Set up notifications and reminders.
Customizable eSignature workflows
Build and scale eSignature workflows with clicks, not code. Benefit from intuitive experience with role-based signing orders, built-in payments, and detailed audit trail.
Award-winning PDF software


How to prepare Form 5330
About Form 5330
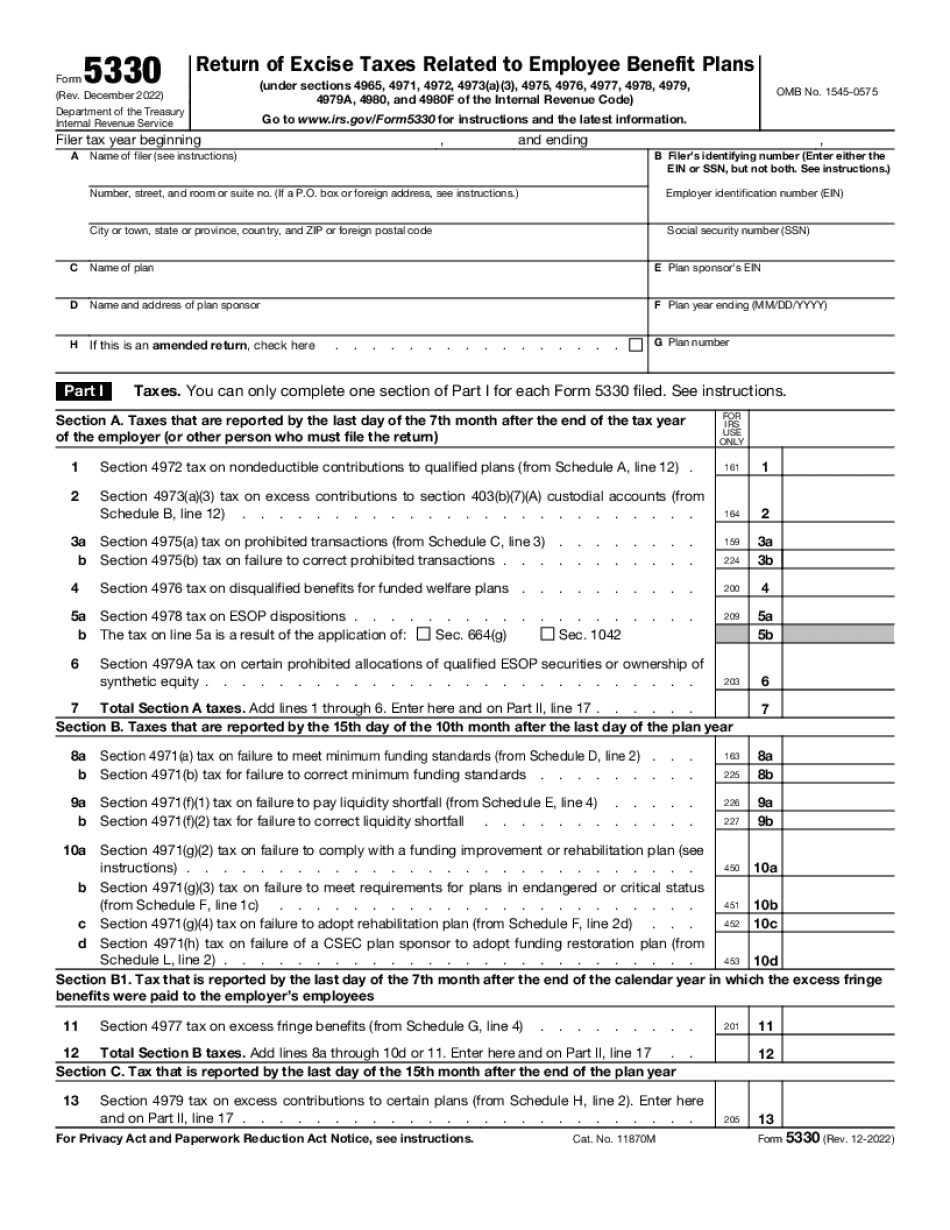
Form 5330 is a tax form used by the Internal Revenue Service (IRS) in the United States. It is known as the Return of Excise Taxes Related to Employee Benefit Plans, and it is used to report and pay excise taxes that may be applicable to certain employee benefit plans. This form is typically required for plan administrators or employers who offer employee benefit plans such as pension plans, profit-sharing plans, or stock bonus plans. These plans are subject to certain tax provisions under the Internal Revenue Code, and if these provisions are violated, excise taxes may be imposed. Form 5330 is used to calculate and report any excise taxes owed by the plan or the employer. Some common reasons for filing this form include late or improper distributions, prohibited transactions, failure to meet certain minimum funding requirements, excess contributions, or violations of certain vesting rules. It is important for plan administrators or employers to understand the requirements and guidelines related to employee benefit plans to determine if Form 5330 needs to be filed. Consulting with a tax professional or the IRS can provide more accurate and specific information regarding the filing of Form 5330 and the associated excise taxes.
What Is 5330 Form?
Online technologies enable you to arrange your file administration and enhance the productiveness of your workflow. Observe the quick tutorial in an effort to complete Irs 5330 Form?, prevent errors and furnish it in a timely way:
How to fill out a Form 5330?
-
On the website with the form, press Start Now and move to the editor.
-
Use the clues to complete the relevant fields.
-
Include your individual data and contact information.
-
Make certain that you enter accurate details and numbers in proper fields.
-
Carefully examine the written content of your form so as grammar and spelling.
-
Refer to Help section if you have any questions or contact our Support staff.
-
Put an digital signature on the 5330 Form? Printable with the help of Sign Tool.
-
Once blank is completed, click Done.
-
Distribute the ready document by means of email or fax, print it out or download on your device.
PDF editor allows you to make adjustments to your 5330 Form? Fill Online from any internet connected device, customize it in line with your requirements, sign it electronically and distribute in several approaches.
What people say about us
The best way to submit forms without mistakes
Video instructions and help with filling out and completing Form 5330